Bulbs are some of the easiest and most dramatic flowers you can add to your landscape and containers, and you can make them even more spectacular when you create layers of bulbs for lush growth and bursts of brilliant color. But how can you go about layering bulbs for the best results?
Why Bother With Layers?
Bulbs are already easy and productive, but they can be so much more when you create bulb lasagna with multiple layers. Layering creates thicker foliage that can serve as great ground cover, and incorporating different types of flowers adds more color variety and textural diversity to the landscape. Layers ensure there are no gaps in your flowerbeds, and can fill in difficult spaces such as tight corners, small pots or narrow areas. This maximizes the use of space in your yard, and when you choose bulbs with overlapping bloom periods, you prolong the flowering season to enjoy beautiful bulbs for many weeks.
Best Bulbs for Layering
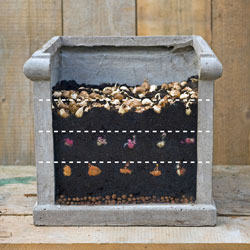
Any bulbs can be incorporated into layers, but you will have the best results when you choose bulbs with similar preferences for moisture levels, sunlight exposure and soil type. Depending on the planting depth or size of container you may be using, you can create 2-4 layers, positioning the largest, latest blooming bulbs on the bottom layer and the smaller, earlier bloomers on the top layer closest to the soil’s surface. Popular bulbs for layering include…
- Bottom (Deepest) Layer: Larger tulips, later daffodils, various lilies
- Mid-Season Layers: Daffodils, tulips, allium, grape hyacinths
- Top (Earliest) Layer: Crocus, freesia, snowdrops, scilla
When choosing bulbs for your pots or landscape layering, consider the flower colors and opt for coordinating hues, bearing in mind that the earliest bloomers and latest bloomers are not likely to be seen at the same time. This is a good opportunity to create a color-changing arrangement that will offer continual thrills as the seasons change. At the same time, opt for flowers of different heights for even more textural interest.
Tips to Create Beautiful Bulb Lasagna
When you’re ready to start layering bulbs…
- Use a deep pot, at least 10-14 inches for two layers of bulbs, and up to 18 inches deep for a triple-layered pot. If you’re planting bulbs in your landscape, be sure the hole is deep enough for all the bulbs you’ve chosen.
- Amend the soil well with compost, bone meal or bulb booster fertilizer to ensure strong growth for each layer. Because so many bulbs will be competing for the soil’s nutrition, good fertilization is essential, but do not over-fertilize or you may burn delicate bulbs.
- Space each individual layer slightly wider than you would typically pack bulbs to give lower layers room to grow around upper bulbs, but don’t worry – they will find spaces between each layer and grow through with ease.
- Provide good drainage in your pot or at the bottom of the hole with sand or gravel so excess water can drain away quickly. This will minimize the risk of root rot, even though a layered pot may require extra watering to hydrate a greater number of bulbs.
- Deadhead flowers as their blooms die off, but leave their foliage intact. The growing leaves will continue to photosynthesize, adding nourishment to the bulb so it can rebloom the next season. Once the leaves dry and die off naturally, they can be removed.
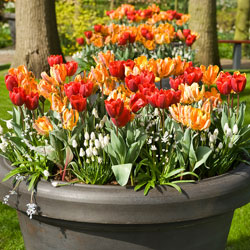
Layering bulbs can be a great way to create a colorful, long-lasting display. Fast and easy to arrange with little care needed to look its best, you won’t be sorry you experimented with bulb lasagna!